Work In Progress: Raine, Update 2
I’m a little late on this installment. Had a number of other responsibilities to take care of, and they took priority this past week. One of these responsibilities had to do with art, but from a construction point of view. I’m in the process of making changes to a sun room that will transform it into a studio. The room faces the back yard with a view to the gardens along the west side of the property. The view is enhanced by almost continuous windows along a semicircular west wall. I think it will eventually prove to be a great environment in which to do my painting.
Now, on to Update 2.
The first step in this portrait is the size and placement of the head on the paper. Portraits are generally done life size or a bit smaller. I want the size of the portrait to be 16” high by 20” wide. Most of my portraits are a vertical format but the photo suggested a horizontal format and I’m intrigued by the idea. The wind is blowing the pony tails outward, making the shape of the head, including hair, more horizontal than vertical
I also don’t want to paint just the head. I want to include the neck and shoulder as well. I don’t want to give the impression of a free floating head in space, but rather the head is connected to a body, even though only a portion of the body is shown. Additionally, I don’t want the portrait to crowd the margins. I decided to leave two inches around all sides. That gave me 12 inches for the portrait and approximately 8 inches, or a bit less, for the head.
Using Photoshop Elements I determined the size photograph I would need so that the head on the photo would be one-half the final portrait size. That way, all measurements on the photo, doubled, would give me the final measurements for the portrait. Easy and convenient.
Steps to a likeness
I’m going to draw the portrait of Raine first on tracing paper. That way I can feel comfortable making the preliminary drawing with all it entails – making mistakes, adjusting, erasing and re-drawing lines (and starting over, if necessary) until I’m satisfied with the likeness. When I have a likeness, I can transfer it to the finish paper. No point in ruining a good sheet of pastel paper. I’ve broken down the portrait process into steps which work well for me and, if followed, can lead to a good likeness. The photos that accompany this discussion show the progression.
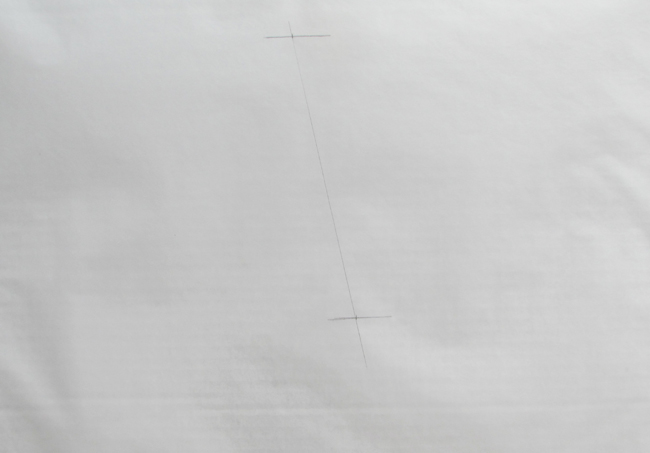
Step 1: Mark the location of the topmost point of the head and center of the chin.
I marked the topmost point of the head on the photo and marked the same point on the tracing paper. Next, knowing the length of the head I desired, I marked the level of the center of the chin on the tracing paper, and then marked the center point of the chin on the photo.
This next step is critical to the rest of the drawing. On the photo, I drew a line from the topmost point on the head to the center point of the chin. I then drew a line on the tracing paper at the same angle from the topmost point of the head to the line indicating the level of the chin. Where this line crossed the chin level line is the center point of the chin. It is important to get this angle correct because the placement of all points of the head are dependent on it.
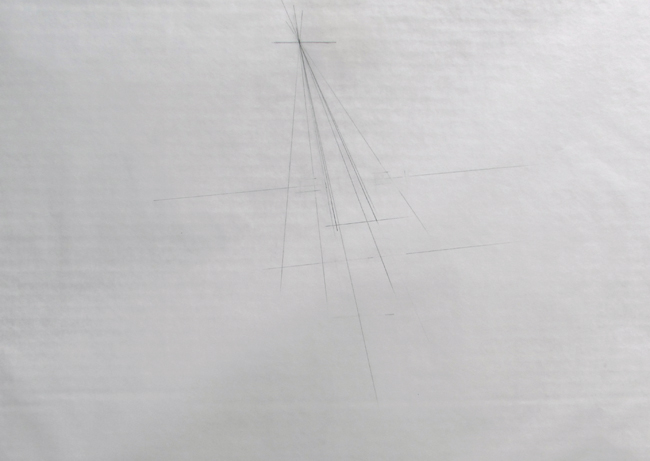
Next, on the photo, I drew lines from the top of the head to the outside corners and inside corners of both eyes. On the drawing, I drew lines with the same angles, from the top point. To locate the position of the eyes, I measured, on the photo, the distance from the top reference point to the outside and inside corners of the eyes, then doubling this distance, located the position on the same lines on the drawing. I checked the angles and distances from the chin reference point to the corners of the eyes to make sure the eyes were located correctly. I also drew a line through the eyes on the photo and, noting the angle, duplicated it on the drawing. The angles and distances should match.

I repeated the same process with the outside corners of the mouth and the wings of the nose.
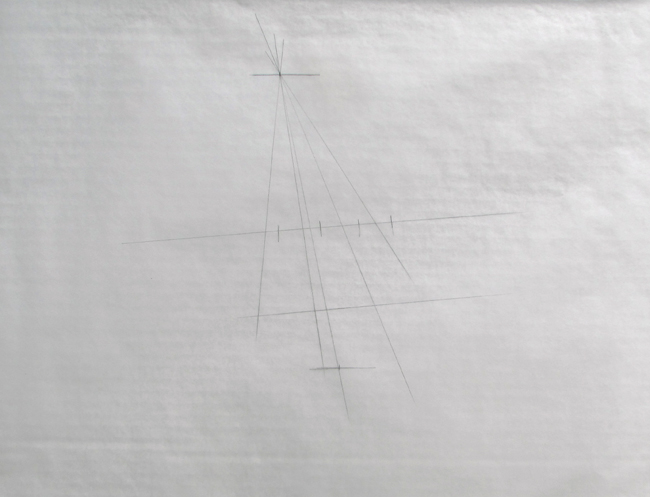
To further check the accuracy of the layout, the angles and distances between all the points established (eyes, mouth, nose, chin and top of head) can be measured and adjustments made until they all match the photo.
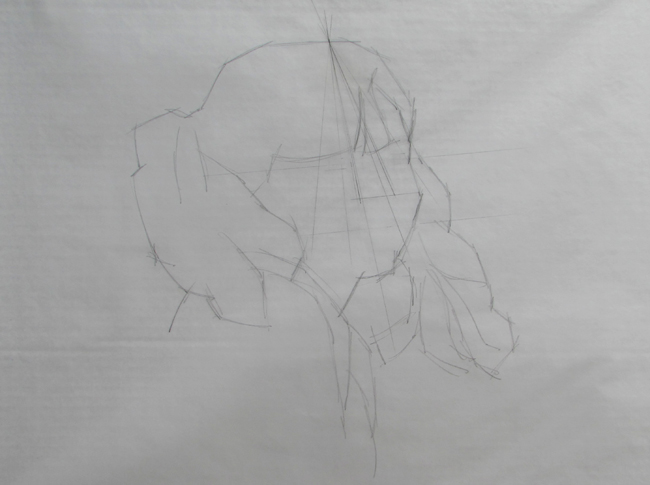
Step 2: Blocking in the head
After indicating the top of the head and the center of the chin, the location of the eyes , nose and mouth, the rest of the head can be roughly blocked in. Straight lines are used at first because they are easiest to draw with accuracy. One by one, I pick major points around the head and determine the angles and distances to them from the topmost point of the head. Using the center point of the chin, I repeat the same procedure and, by triangulation, the intersection of the angles from the two reference points (top of head and center of chin) indicate the location of the major points around the head. By sketching in lines connecting these points, I now have a rough (but fairly accurate) outline of the head.
I’ll stop at this point and in the next Update I’ll go on with refining this rough drawing to come up with a likeness.